Did you know building a DIY drone can cost about $100? You only need a few parts like propellers, motors, and a battery. This lets you make your own drone for aerial photos or racing.
Over 60% of drone fans like making their own drones more than buying them. Building your drone saves money, lets you customize it, and teaches you about electronics and aerodynamics. It’s a fun and educational project for beginners and experts alike.
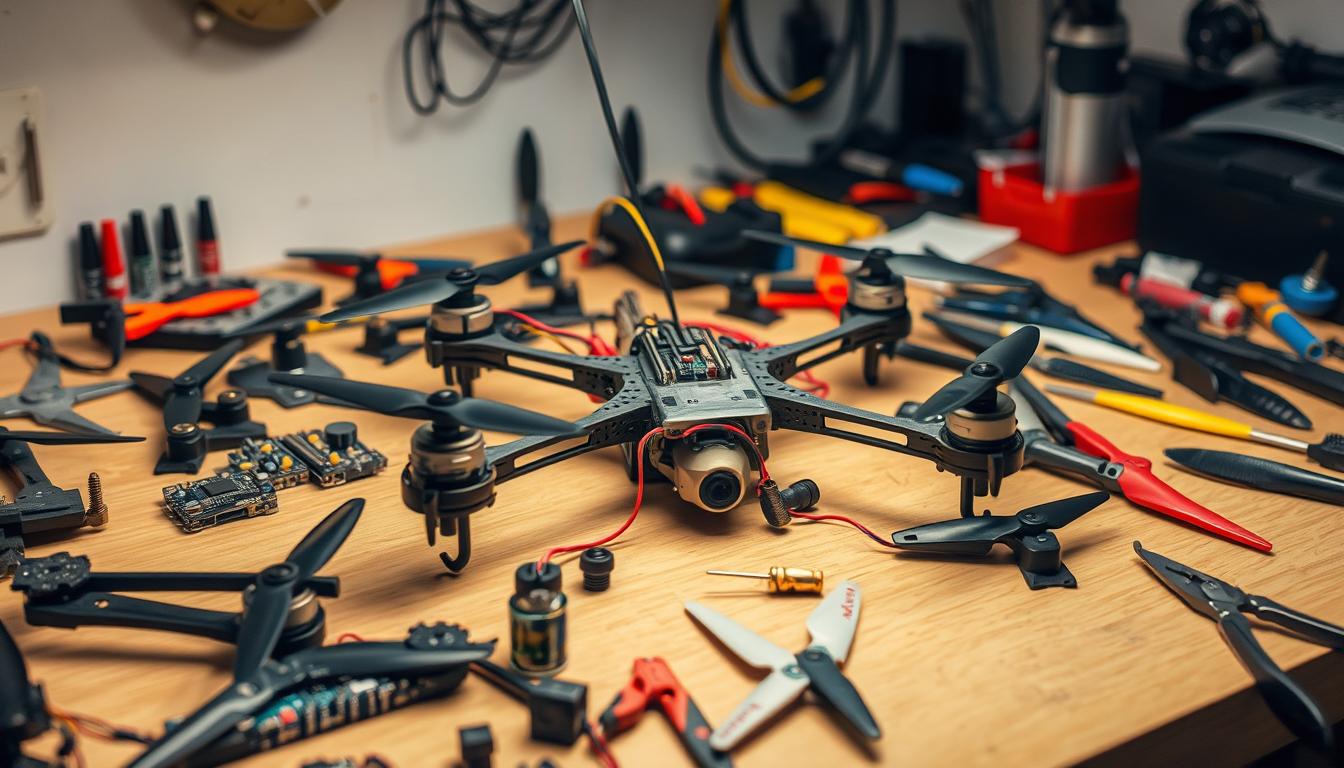
Starting your DIY drone project means knowing what parts you need and how to put them together. You’ll need a frame, flight controller, motors, propellers, and a battery for it to work well. Adding a camera or sensors can make your drone even more useful for things like taking photos from the air or helping in search and rescue.
As you build your drone, it’s important to test it to make sure it’s safe and works right. You should check everything before flying, test each part, and make sure it’s balanced. This helps avoid accidents and makes your drone fly better.
Key Takeaways
- Building a DIY drone offers cost savings, customization options, and educational opportunities.
- Understanding the necessary components and step-by-step assembly process is crucial for a successful DIY drone project.
- Incorporating a camera or sensors can expand your drone’s capabilities for various applications.
- Thorough troubleshooting and testing ensure the safety and reliability of your DIY drone.
- Proper center of mass and balance are essential for optimal drone performance and stability.
Understanding the Basics of Drone Physics
To keep our drones flying well, we need to know the basic physics. Forces like mass, torque, and Newton’s laws affect how drones work. This knowledge helps us fix and improve our UAVs.

Newton’s Laws of Motion Applied to Drones
Newton’s laws are key for drone flight. The first law says objects stay still or keep moving unless a force changes them. This means drones will keep flying straight unless we change their path or speed.
The second law, F=ma, shows how force and mass affect speed. Heavier drones need more force to move fast or change direction. This is because they have more mass.
Effects of Mass on Drone Performance
The mass of a drone affects how it flies and how long it stays aloft. Lighter drones have big advantages:
- They can fly longer because they use less power.
- They react faster to our controls.
- They are more agile and easy to maneuver.
When making and fixing drones, we aim for the right mix of parts and light weight. This improves how well they perform.
Torque and Its Impact on Drone Stability
Torque, from the spinning propellers, can make drones unstable if not managed. It makes the drone want to turn the other way. To fix this, we can:
- Use propellers that spin in opposite directions to balance.
- Add a tail rotor to balance the torque.
- Adjust motor speeds to keep the drone steady.
By controlling torque, we keep our drones stable and easy to control.
As we learn more about drone physics, we’ll get better at making, fixing, and improving our drones. This will help them fly their best.
Choosing the Right Frame for Your DIY Drone
When you start making your own drone, picking the right frame is key. The frame gives your drone its shape and affects how well it flies. It’s important to think about a few things when picking a frame for your drone.

Building your own drone can save you money compared to buying one. By picking the right size and material for your frame, you can make a drone that fits your needs. This could be for work like checking crops or helping in emergencies.
Factors to Consider When Selecting Frame Size
The size of your drone’s frame is important for how it moves and stays steady. Smaller frames are great for racing because they are fast and easy to control. But, bigger frames are better for flying longer distances and carrying more weight.
Think about these things when picking your frame size:
- What you want to use your drone for
- How you want your drone to fly (fast or steady)
- How much you need to carry
- The size and weight of your batteries
Popular Frame Materials and Their Pros and Cons
The material of your drone’s frame affects how strong it is, how much it weighs, and how well it flies. Here are some common materials and their good and bad points:
| Material | Pros | Cons |
|---|---|---|
| Carbon Fiber | Light, strong, and stiff | Costs a lot |
| Aluminum | Affordable, tough, and easy to work with | Heavier than carbon fiber |
| Wood | Cheap and easy to change | Not as strong and heavier |
| Foam | Light and cheap | Not as strong and can get damaged |
| Plastic | Cheap and easy to find | Not as strong and shakes a lot |
When picking your frame material, think about your budget, what you’ll use your drone for, and how strong and light you need it to be. Carbon fiber and aluminum are good choices because they are strong and light.
The frame is the base of your DIY drone, making up about 90% of it. Pick the right one, and you’ll be on your way to making a drone that does what you need it to.
Designing and Assembling Your Drone Frame
When you start designing and assembling your drone frame, there are key things to think about. There are many frame types, like H Frame, X Frame, and Quadcopter Frame. Quadcopter frames are the most common and simple. They offer stability and are great for aerial photography and videography.
Folding frames are perfect for travelers and drone pilots who need something portable. These frames fold up for easy transport and storage. When designing your drone, remember to include all the necessary parts, such as:
- Frame
- Motors and propellers
- Electronic speed controllers
- Flight controller
- Battery and power distribution board
Carbon fiber sheets are a top choice for their strength and lightness. We used 2mm thick carbon fiber sheets in our design. For precision, we printed parts in PLA at a 0.2mm layer height using a 3D printer.
We cut the carbon fiber plates with a CNC router, the MPCNC. This DIY CNC router is affordable, costing less than $400. It has a 36x36cm working area and we used a 2mm end-mill to avoid breaking smaller bits.
| Item | Cost |
|---|---|
| Waste board (MDF, 240mm x 340mm x 12mm) | $0.90 |
| Set of small needle files for finishing | $10.00 |
When putting your drone frame together, focus on the arm orientation. Make sure all parts are securely attached. Proper assembly is key for stability and performance. Be careful with carbon fiber dust during finishing to avoid health risks.
Always prioritize safety and be aware of local regulations when operating your DIY drone.
Powering Your DIY Drone: Battery and Electronics
The heart of your DIY drone is its electrical system. It includes the battery, control board, and motors. Knowing how these parts work together is key to a reliable and efficient drone.
Understanding the Drone’s Electrical Schematic
The battery’s power goes to the motors and control board. The control board changes the motor speeds based on the controller’s signals. Here’s a simple electrical schematic of a typical drone:
When picking parts for your drone’s electrical system, keep these tips in mind:
- ESCs (Electronic Speed Controllers) are needed for brushless motors and require an input of three out-of-phase voltages.
- Brushless motors are more efficient and preferred for high-quality drones. They come in two subclasses: inrunners and outrunners, classified based on the location of the rotor and stator components.
- The control board decodes signals from the controller and adjusts motor speeds.
Choosing the Right Battery for Your Drone
Lipo batteries are often used in drones because of their high energy density and discharge rates. When picking a battery, consider these factors:
| Factor | Description |
|---|---|
| Voltage | A typical specification is 4S, indicating 4 Lipo cells in series. |
| Capacity | Measured in mAh, representing the charge volume. Higher capacity means longer flight times. |
| Discharge Rate | Expressed as a C-rating, higher discharge rates allow for more powerful motors. |
| Weight | Choose a battery that provides the right balance between power and weight for your drone’s size and intended use. |
For example, a common battery for a medium-sized drone might be 3000 mAh 4S 50C. It offers a good balance of capacity, voltage, and discharge rate.
Choosing the right battery and understanding your drone’s electrical system are essential steps in building a high-performance DIY drone.
Motors and Electronic Speed Controllers (ESCs)
The heart of your DIY drone is its motors and ESCs. Choosing the right ones is key for great performance and efficiency. Let’s explore brushed and brushless motors, ESCs, and the differences between inrunner and outrunner motors.
Brushed vs. Brushless Motors: Which is Best for Your Drone?
For your drone, you can pick between brushed and brushless motors. Brushed motors are simpler and cheaper but less efficient and wear out faster. Brushless motors, on the other hand, are more efficient, faster, and last longer, making them better for most drones.
Think about these points when picking between brushed and brushless motors for your DIY drone:
- Efficiency: Brushless motors are more efficient, converting more electrical energy into mechanical energy.
- Speed: Brushless motors can achieve higher speeds than brushed motors.
- Durability: Without brushes, brushless motors have a longer lifespan and require less maintenance.
- Cost: Brushless motors are more expensive than brushed motors, but their benefits often outweigh the added cost.
The Role of ESCs in Brushless Motor Operation
Electronic speed controllers (ESCs) are crucial for brushless motors in drones. ESCs control the motor’s speed and direction. They also manage the power flow from the battery to the motor, ensuring safe and efficient operation.
When choosing an ESC for your drone, consider these:
- Current rating: Choose an ESC with a current rating 10-20% higher than your motor’s maximum current at 100% throttle to prevent overheating.
- Firmware: ESCs with BLHeli_S firmware offer smoother and more responsive motor control, supporting protocols like Oneshot125 and Multishot.
- Protocol: DShot and ProShot protocols provide lower latency and higher update rates compared to traditional PWM signals.
- BEC: Linear BECs are cheaper but less efficient, while switched BECs are more efficient but pricier. Ensure the BEC can handle your drone’s power requirements.
| ESC Feature | Importance |
|---|---|
| Current Rating | Matches the maximum current drawn by the motors to prevent overheating and damage |
| Refresh Rate | Higher refresh rates (e.g., 400Hz) provide quicker adjustments during flight maneuvers, improving stability |
| Compatibility | Ensures seamless integration with the drone’s power system and flight controller |
| Size and Weight | Matches the size and weight of the drone for optimal performance without adding excess bulk |
Inrunner and Outrunner Motors: Understanding the Difference
Brushless motors are divided into inrunner and outrunner types. Inrunner motors have the rotor inside, while outrunner motors have it outside. Outrunner motors are more common in drones because they have higher torque and efficiency.
Outrunner motors are the preferred choice for most drones because they offer better torque and efficiency compared to inrunner motors.
When choosing between inrunner and outrunner motors for your DIY drone, consider the drone’s size and weight, desired thrust, and overall efficiency of the motor.
Troubleshooting and Testing Your DIY Drone
Building a DIY drone means making sure everything works right and it’s safe to fly. Troubleshooting and testing before flying can save you a lot of trouble. It saves time, money, and avoids headaches.
Common Issues and Their Solutions
When building a DIY drone, you might face issues like motor and ESC problems, battery issues, and PID controller tuning. Start by checking all connections and making sure everything is calibrated right. Adjusting settings and fine-tuning your drone can fix many problems.
Performing a Comprehensive Pre-Flight Checklist
Before flying your DIY drone for the first time, do a detailed pre-flight checklist. This checklist should cover testing intelligent flight modes, camera settings, speeds, video quality, and return-to-home accuracy. This way, you can find and fix any issues before they cause problems during flight.
Users say DJI GO 4 updates 4.2.20 and 4.2.21 have new features and improvements. They suggest testing intelligent flight modes, camera/video settings, Active Track, and other features after updates. This ensures your drone works its best.
Testing Individual Components and Systems
It’s also key to test each part and system separately. This means checking motors, ESCs, and sensors to make sure they’re working right. Testing each part helps you find and fix problems more easily.
While testing parts is important, it’s not as thorough as what manufacturers do. For example, DJI Care Refresh requires a video showing your drone works perfectly. This shows how important detailed testing is.
Experienced drone pilots have shared their flight distances. This shows how crucial component testing and drone troubleshooting are:
- QuadKid: 482,349 ft
- Wachtberger: 261,509 ft
- S.D. Pilot: 10,400,463 ft
- SparksBird: 10,731,690 ft
- GDL: 2,768,694 ft
- HedgeTrimmer: 945,105 ft
By troubleshooting and testing your DIY drone, you can have a safe and fun flying experience. Plus, it helps your drone last longer.
Ensuring Proper Center of Mass and Balance
When building a DIY drone, the center of mass is crucial. It affects the drone’s stability and performance. An off-center mass can make the drone hard to control and unstable.
To get the best drone stability, the center of mass must align with the drone’s geometric center. This is done by placing components carefully and using balancing techniques.
The Importance of Center of Mass in Drone Stability
The center of mass is where the drone’s weight is evenly spread. When it’s right, the drone flies smoothly and predictably. But, an off-center mass can make the drone tilt or spin unexpectedly, making it hard to control.
Here are some stats on how weight affects drone stability:
| Component | Mass (g) |
|---|---|
| Motors (4) | 148 |
| Propellers (4) | 13.5 |
| Battery (1) | 155 |
| Other components | 460.5 |
| Total original drone weight | 777 |
A well-balanced drone will have better flight performance and stability.
Techniques for Balancing Your DIY Drone
To balance your DIY drone, try these balancing techniques:
- Adjust component placement: Position the battery, camera, and flight controller to spread the weight evenly.
- Use counterweights: Add small weights to the opposite side if needed to balance out heavier components.
- Ensure symmetrical weight distribution: Make sure the weight is evenly spread across all four quadrants of the drone.
By using these techniques, you can greatly improve your DIY drone’s stability and flight performance. A balanced drone is essential for smooth, controlled flights and great aerial footage.
Fine-Tuning Your Drone’s PID Controller
At the heart of every stable drone is a well-tuned PID controller. This controller keeps the drone steady by adjusting motor outputs based on sensor data. Adjusting the PID values can make your drone fly better, smoother, and more stable.
Finding the right balance between quick response and stability is key. A good PID controller lets your drone react fast but avoids big jumps and wobbles. You’ll need to tweak the gains manually and use auto-tuning methods.
Before you start tuning, make sure your drone is set up right. This means calibrating sensors, checking motor directions, and setting up the flight controller. With a solid base, you can start tuning.
Start with the values recommended by the flight controller maker or the community. These are good starting points. You can then adjust them based on your drone and flying style. Make small changes and test each one to avoid overdoing it.
Here are some tips for tuning PID values:
- The suggested rate degree per second movement for pitch and roll is 250, while for yaw it is advised to start at around 380.
- The recommended DPW (degree per second) for super rate is around 700 for snappy but smooth control.
- Adjust the RC Super Rate to achieve optimal control without oversteering.
- Test the drone by hovering, blipping the throttle, performing full stick deflection in pitch or roll, and returning to center to assess control and adjust rates.
First, focus on getting fine control and precise movements. Knowing how your drone responds to inputs helps a lot in tuning.
Remember, tuning PID values takes time and patience. Keep track of your changes and see how they affect the drone. With time and effort, you’ll get your drone flying smoothly and stably.
Advanced Troubleshooting Techniques for DIY Drones
When we’re fixing our DIY drones, looking at flight logs and telemetry data is key. These tools help us find problems that aren’t easy to see. By digging into the data, we can find out what’s wrong with our drone’s parts, software, or settings.
To really fix our drones, we should compare logs from good flights to bad ones. This helps us understand what’s causing the problems. Luckily, there are special software tools that make analyzing this data easier and more accurate.
When we build our DIY drones, knowing about the parts is important. Drones come in different sizes, like 2″ Micro Builds to 7+” Class Builds. The 5″ mini class build is popular for its power and ability to carry a GoPro camera.
Choosing the right motors is also crucial. We need to think about the stator diameter, magnet height, and KV values. These affect how well the drone flies, its weight, and speed. Knowing this helps us fix and improve our drones.
As we dive deeper into DIY drones, using advanced troubleshooting and staying up-to-date is essential. By using flight logs, telemetry data, and understanding drone parts, we can make our DIY drone projects better. This way, we can reach new heights and enjoy flying more.