Did you know building your own drone can save up to 50%? It’s true! Making your own drone is not only cheaper but also lets you customize it. Plus, it’s a great way to learn.
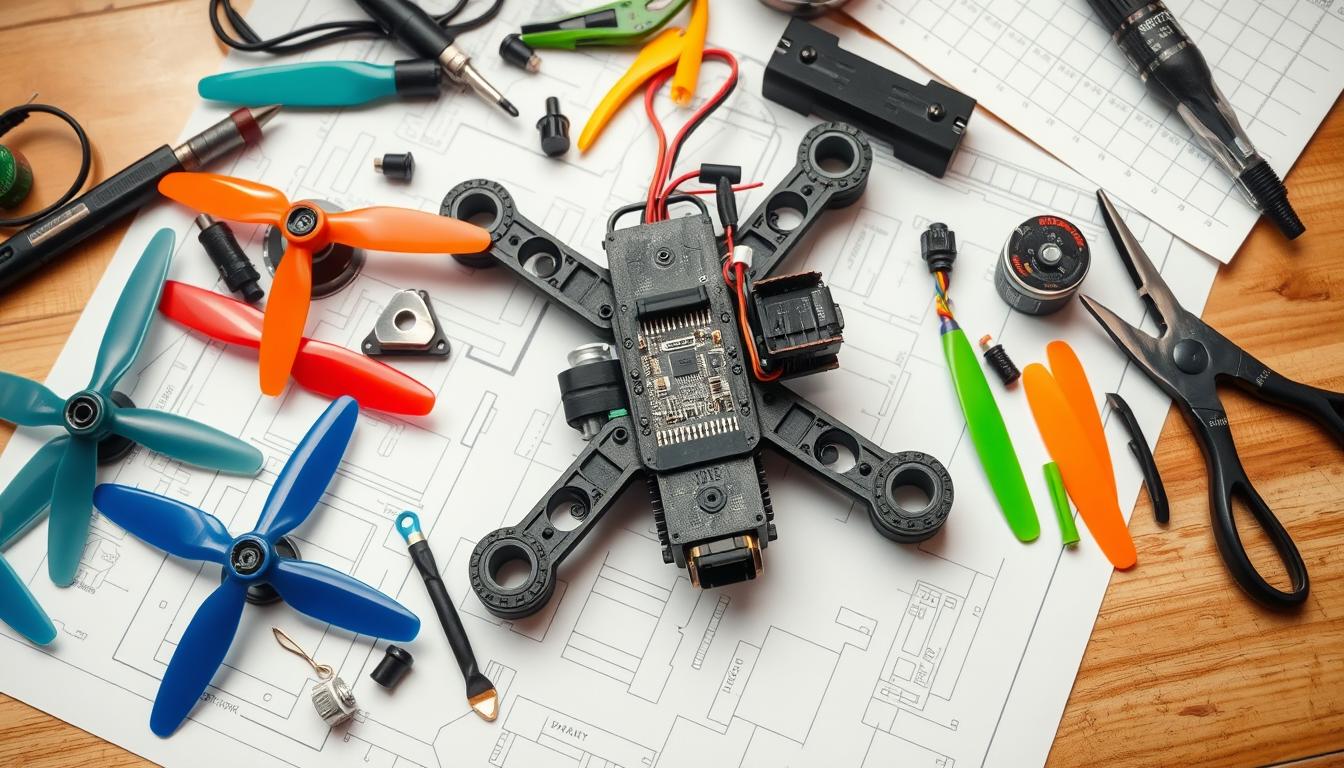
To start your drone project, you’ll need a list of parts. You’ll need a frame, flight controller, motors, propellers, and a remote control system. Don’t forget a battery and maybe a camera or sensors too. Picking the right parts is key for a good build.
When picking parts for your drone, think about how many motors and propellers you need. They should match for the best thrust. Also, choose top-notch parts for important things like motors and the flight controller. This will make your drone faster, more stable, and easier to control.
Key Takeaways
- Building your own drone can save up to 50% compared to buying a ready-to-fly model.
- Essential drone components include a frame, flight controller, motors, propellers, remote control system, and battery.
- Choosing the right parts based on compatibility, size, weight, and desired performance is crucial for a successful build.
- Investing in high-quality components for critical parts like motors and flight controller can enhance your drone’s performance.
- The number of motors and propellers should be equal for efficient thrust force.
Understanding the Basics of Drone Components
Starting a DIY drone project means knowing the drone components and their roles. A good drone parts overview helps you choose the right parts. Let’s explore the main essential drone parts needed for a working drone.

The drone’s frame is its core, giving it structure and holding all parts. The flight controller is the drone’s brain, handling data and controlling the motors for stable flight. Brushless motors, known for their efficiency, work with propellers to move the drone.
| Component | Purpose |
|---|---|
| Frame | Provides structural support and houses other components |
| Flight Controller | Acts as the brain, processing sensor data and controlling motors |
| Motors | Generate thrust for flight, typically brushless for efficiency |
| Propellers | Work with motors to generate lift and allow directional control |
| Electronic Speed Controllers (ESCs) | Regulate power to the motors based on flight controller signals |
Electronic Speed Controllers (ESCs) control the power to the motors. LiPo batteries power the drone’s parts. A drone needs as many motors as propellers for best performance.
Popular brands for drone motors and propellers include T-Motor, EMAX, and Gemfan, known for their quality and performance in drone parts.
When picking parts for your DIY drone, balance performance with cost. Don’t spend too much on parts you don’t need. Local shops and online stores like NW Blue have a wide range of drone parts. Online stores often have more options at good prices.
Selecting the Right Frame for Your Drone Build
Choosing the right frame is key when building your DIY drone. The frame is the drone’s backbone, holding all parts together. Let’s look at what to consider when picking a frame for your drone.

Frame Materials: Carbon Fiber vs. Aluminum
Drone frames are often made of carbon fiber or aluminum. Carbon fiber is light and strong, perfect for fast drones. It’s great for racing and freestyle flying.
Aluminum frames are stronger but heavier. They’re good for durability and less likely to break in crashes. But, they can make your drone heavier, affecting its flight and battery life. Plastic frames are cheaper and light but not as durable as carbon fiber or aluminum.
Choosing the Appropriate Frame Size
Frame size depends on the distance between diagonal motors. It’s classified as nano, micro, small, medium, or large. The most common size is 210mm, or 5 inches.
Think about your drone’s purpose when choosing a size. Smaller frames are agile for tight spaces, while bigger ones are stable for heavy payloads. The size affects your drone’s weight, impacting flight time and performance.
| Frame Size | Propeller Size | Application |
|---|---|---|
| Nano (under 100mm) | 2-3 inches | Indoor or tight spaces |
| Micro (100-150mm) | 3-4 inches | Small outdoor areas |
| Small (150-250mm) | 4-6 inches | Racing and freestyle |
| Medium (250-350mm) | 6-8 inches | Aerial photography and videography |
| Large (350mm and above) | 8 inches and above | Heavy-lift and long-range applications |
Consider the frame design too, like X-Frame, H-Frame, or True-X. They affect weight, space, and agility. Think about portability, flight time, payload, and crash resistance when choosing your frame.
Motors and Propellers: The Heart of Your Drone
Building a DIY drone starts with picking the right motors and propellers. These parts work together to lift and thrust your drone into the air. Let’s explore drone motors and propellers to help you choose wisely for your build.
Brushed vs. Brushless Motors
Drone motors are either brushed or brushless. Brushless motors are better because they’re more efficient (85-90%) and last longer. They’re great for racing and freestyle drones. Brushed motors are cheaper but don’t last as long.
Understanding Motor Specifications
When picking drone motors, look at their specs. The size is shown in a four-digit number, like 2207 or 2306. The first two digits are the stator diameter, and the last two are the stator height. The KV rating shows how fast the motor spins without a load. Faster KV motors are for racing, while slower ones are more efficient.
| Motor Size | Stator Diameter (mm) | Stator Height (mm) |
|---|---|---|
| 2207 | 22 | 7 |
| 2306 | 23 | 6 |
Propeller Size and Pitch
Propellers vary in size, shape, and number of blades. The most common size is 5 inches, balancing power and smoothness. Bigger propellers lift more but make the drone harder to maneuver. Smaller ones are better for fast, agile drones.
Propeller pitch is also important. A higher pitch propeller moves more air, making the drone faster but needing more power.
Choosing the right propellers for your motors is key for the best performance.
Knowing about drone motors and propellers helps you pick the best parts for your DIY drone. Think about motor size, KV rating, propeller size, and pitch to make sure your drone flies well.
Electronic Speed Controllers (ESCs) and Their Role
Electronic speed controllers (ESCs) are key in any drone build. They control the speed and direction of brushless motors. These devices act as a link between the flight controller and motors, turning digital signals into the electrical pulses needed.
When picking ESCs, look at current rating, input voltage, weight, size, firmware, and supported protocols. The current rating should be 10-20% higher than the motor’s max current at 100% throttle. The input voltage must match your drone’s battery, from 3S-4S to 6S.
The firmware on the ESC affects its performance. Popular options include BLHeli, BLHeli_S, SimonK, KISS, and BLHeli_32. BLHeli_S offers smoother motor response and supports Oneshot125, Oneshot42, and Multishot. BLHeli_32 supports Dshot1200 but requires a license fee.
The ESC processor also matters for performance and compatibility. Common processors are Atmel 8-bit for BLHeli, Silabs 8-bit for BLHeli_S, and Atmel ARM Cortex 32-bit for BLHeli_32. Single ESCs weigh 4-6 grams, while 4-in-1 ESCs weigh 12-15 grams.
| ESC Protocol | Packet Duration | Benefits |
|---|---|---|
| DShot1200 | 13.4 microseconds | Better reliability and performance |
| ProShot | 16-bit DShot encoded into 4 PWM pulses | Higher update rates |
ESCs play a crucial role in controlling the speed of brushless motors through the flight controller and power supply from the battery.
Choosing the right ESCs is vital for your drone’s performance. Consider current rating, firmware, protocols, and processor. This ensures smooth motor control and a great flying experience.
Flight Controllers: The Brain of Your Drone
Building a DIY drone? The flight controller is key. It controls sensors, keeps things stable, and talks to other drone parts. Picking the right one is crucial for top performance.
Popular Flight Controller Options
Many flight controllers are out there, each with special features. Here are some top picks we’ve looked at:
| Flight Controller | Price | Key Features |
|---|---|---|
| Original Pixhawk | $120 | 32-bit processor, more powerful than APM |
| Pixhawk Cube | $250 | Newer design, future-proofing capabilities |
| Navio2 | $205 | Linux-based, attaches to Raspberry Pi |
| BeagleBone Blue | $90 | Linux-based, designed for smaller drones |
| DJI Naza | $200 | Closed-source firmware, plug-and-play functionality |
When picking a flight controller, think about cost, open-source support, and how it works with FPV racing. Also, consider its autonomous features, processor type, and how popular it is in the drone world.
Integrated vs. Standalone Flight Controllers
Flight controllers can be either all-in-one or separate. All-in-one controllers have power distribution and ESCs in one, making wiring easier and your drone lighter. Separate controllers need extra parts for power and motor control.
Choosing between integrated and standalone depends on what you need. Integrated controllers are neat and simple. Standalone controllers offer more options and customization.
Think about your drone’s purpose and what features you want. With the right flight controller, your DIY drone will be top-notch and reliable.
Choosing the Right Parts for Your DIY Drone
Building a DIY drone is an exciting project. It lets you customize your aircraft to fit your needs and preferences. But, picking the right parts can be tough, even if you’re new to drone building. We’ll talk about how to match components for the best performance and think about your drone’s purpose and budget.
Matching Components for Optimal Performance
To make sure your drone flies well, choose parts that work well together. Look at size, power, and function. Here are some key things to think about:
- Quadcopter Frame: You need at least three propeller fitting gaps. There are many shapes and sizes.
- Motors: You need as many motors as propellers for the best thrust and control. Think about voltage, current, thrust, power, efficiency, and speed.
- Electronic Speed Controllers (ESC): ESCs control motor speed and act as a dynamic brake. They help guess altitude during flight.
- Flight Controller Boards: These record takeoff locations, calculate altitude, and have a ‘return to home’ function.
- Propellers: They create air pressure differences for lift. There are different types for the best performance.
When picking parts, make sure they work together well. For example, your motors should match your ESCs, and your propellers should fit your motors. Also, think about the weight and power use of each part. This ensures your drone has enough thrust and battery life for what you need.
Considering Your Drone’s Purpose and Budget
Think about your drone’s purpose and budget when choosing parts. Different drones need different parts, depending on their use. This could be racing, aerial photography, or long-range flights.
For a racing drone, focus on light parts and high-performance motors and propellers. For aerial photography, you’ll want stability, GPS, and a good camera.
Your budget is also key. You should invest in quality parts but be realistic about what you can afford. Start with the most important parts like the frame, motors, and flight controller. Then add more features and upgrades as you can.
| Drone Kit | Skill Level | Features |
|---|---|---|
| DJI Flame Wheel F550 | Advanced | Professional-grade camera, long flight duration |
| Tarot X6 | Advanced | Advanced flight controller, customizable |
| DJI RoboMaster S1 | Beginner | User-friendly setup, learning tool |
| Tello EDU | Beginner | Affordable, easy to assemble and fly |
| Holybro Kopis CineWhoop | Intermediate | Customizable, suitable for cinematography |
| Eachine Wizard X220S | Intermediate | Fast, agile, ideal for racing |
By thinking about your drone’s purpose, budget, and component compatibility, you can build a DIY drone that meets your needs. With the right parts and some knowledge, you’ll create a drone you can be proud of.
Battery Selection and Power Management
Choosing the right battery is key for a drone’s performance and how long it can fly. Lithium Polymer (LiPo) batteries are top picks for drones. They are light, pack a lot of energy, and handle high currents well.
LiPo Battery Basics
LiPo batteries come with important details like capacity, voltage, and how fast they can discharge. A 5800 mAh/5.8 Ah battery can handle up to 145 A. The C rating shows how quickly a battery can safely discharge.
When picking a LiPo battery, think about a few things:
- Capacity (mAh or Ah): More capacity means longer flights but heavier batteries.
- Voltage: Higher voltage means motors spin faster, but balance is needed.
- Discharge rate (C rating): Higher C ratings mean better drone performance.
- Connector type: Pick a connector like EC3 or XT60 for easy use.
Calculating Flight Time and Capacity Requirements
To figure out your drone’s flight time, use this formula:
Flight time (mins) = Battery Capacity (AH) / ( Motors Number x Motor Current(A) ) x 60 x 0.8
When figuring out battery capacity, think about flight time, drone weight, and component power use. A bigger battery means longer flights but also more weight. Finding the right balance is key.
Keeping your LiPo batteries in good shape is vital for safe flights. Store them in cool, dry places and charge them right. By picking the right battery, you ensure your DIY drone flies safely and well.
First-Person View (FPV) Systems
Step into the world of First-Person View (FPV) drone flying! FPV systems let you fly your drone from its own view. It’s an exciting way to see the world from a new angle.
An FPV setup has three parts: a camera, a video transmitter, and a receiver. When picking your FPV gear, think about resolution, latency, and how it works in the dark. This ensures you get the best video feed.
FPV Cameras and Transmitters
FPV cameras vary in size and quality. Popular ones include the DJI camera, Caddx Nebula Pro, and Runcam Night Eagle. Look for high resolution, low latency, and good low-light performance for the best video.
Video transmitters differ in frequency and power. This affects how far your signal goes and how clear the image is. Choose one that fits your camera and flying style.
“Investing in a reliable FPV system for First-Person View flying can provide a real-time view from your drone, enhancing the flying experience.”
FPV systems can be analog or digital. Analog setups are cheaper but digital systems like HDZero offer better image quality. Many racers prefer digital for its performance.
Choosing the Right FPV Goggles
FPV goggles make flying feel real. You can find everything from budget-friendly to high-end goggles. The DJI Goggles 2, for example, have 1080p OLED screens and are compatible with the DJI OcuSync V3 protocol.
When picking goggles, think about screen quality, field of view, and comfort. Look for adjustable IPD and focus for a better viewing experience.
| Camera | Latency | Frame Rate |
|---|---|---|
| DJI Camera (Original) | 25-35 ms | 120fps |
| Caddx Nebula Pro | 25-35 ms | 120fps |
| Caddx Polar | 35-45 ms | 60fps |
| Runcam Phoenix HD | 35-45 ms | 60fps |
By choosing the right FPV cameras, transmitters, and goggles, you’re ready for FPV drone flying. Dive into the action and improve your flying skills with a great FPV system.
Radio Control Systems for Drones
Building your own drone? Choosing the right drone radio control system is key. It lets you control your drone and talk to it. The system has two parts: the transmitter and the receiver.
The transmitter, or rc transmitter for drones, is the handheld device. It lets you control your drone from afar. It sends signals to the receiver on the drone. The receiver then sends these signals to the flight controller, helping you control the drone.
When picking a radio control system for your DIY drone, think about a few things:
- Make sure it works with your flight controller and other parts.
- Think about how many channels you need.
- Check the range and how reliable the signal is.
- Choose a transmitter that’s easy to hold and use.
Here are some popular radio control protocols for drones:
| Protocol | Features |
|---|---|
| FrSky | Long-range, telemetry, customizable |
| Spektrum | Reliable, widely used, compatible with many receivers |
| FlySky | Affordable, easy to set up, great for beginners |
Make sure your rc transmitter for drones and drone receiver work together well. Some systems even let you see real-time data from your drone. This includes things like battery level, signal strength, and GPS info.
Getting a good radio control system is important for a great drone flying experience.
By picking the right drone radio control parts and making sure they work together, you can make a DIY drone. It will respond well to your commands and keep a stable connection between you and the drone.
Essential Tools for Building Your Drone
Building a drone is exciting and rewarding. But, you need the right tools to do it right. Let’s look at the key tools for your DIY drone project.
Soldering Equipment
Soldering is key for drone building. You’ll need a soldering iron with at least 50W power. Use high-quality 60/40 solder and follow good techniques. Safety tools like soldering helping hands can prevent burns.
Here are some soldering tips:
- Tin your wires before soldering them together
- Use heat shrink tubing to insulate and protect connections
- Double-check your soldering joints for strength and conductivity
Multimeter and Other Diagnostic Tools
A multimeter is crucial for drone builders. It helps test connections, diagnose problems, and check voltage. Choose a multimeter with auto-ranging, a backlit display, and a strong build for your drone building tools kit.
Other tools can also help:
| Tool | Purpose |
|---|---|
| Hex Drivers (M2 and M3) | Assembling and disassembling frame components |
| Small Phillips Head Screwdriver | Handling smaller screws and connectors |
| Wire Strippers or Sharp Scissors | Preparing wires for soldering and connections |
| Wire Cutters or Sharp Scissors | Trimming excess wires and zip ties |
A well-organized toolkit makes building and repairs easier.
Investing in the right drone building tools is key. This includes soldering equipment and a reliable multimeter for drones. With the right tools, you’ll build your drone with confidence. Proper preparation and having the right tools can make your drone building experience successful and fun.
Putting It All Together: Assembling Your DIY Drone
Now that we have all the parts and tools, it’s time to start assembling our DIY drone. We start by building the frame, making sure everything is tight. Then, we attach the motors and ESCs, paying attention to how they’re set up.
Next, we put in the flight controller, the drone’s brain. We connect it to the ESCs, receiver, and other parts using the right wiring diagrams.
As we move along, we make sure the battery and FPV system are secure. A good battery keeps the power steady, and a well-set up FPV system lets us see the world from above. We double-check all connections to avoid any problems when we fly.
After we finish building, we do a pre-flight check. We test everything to make sure it works right, check for loose parts, and make sure all controls are good. This makes sure our drone is ready for a safe and fun flight.
Looking back, building our own drone is rewarding and educational. We learn a lot about each part and how they work together. So, let’s fly our drone with confidence, knowing we built it ourselves.