Did you know that quadcopters make up 90% of the drone market? These four-propeller marvels have won the hearts of many. They offer great stability and control. If you dream of building your own drone, you’re in good company. The DIY drone community is growing fast, with many people creating their own flying machines.
In this guide, we’ll show you how to build your drone from scratch. We’ll cover everything from choosing the right frame to understanding brushless motors and speed controllers. Our step-by-step guide is for everyone, whether you’re new or have some experience. We aim to make custom drone building easy and fun.
Imagine seeing your homemade UAV soar into the sky. You’ll know you picked and built every part yourself. The drone world offers many choices, from small frames to powerful motors and big batteries. We’ll help you find the perfect parts for your project.
As you start this journey, you’ll learn a lot about drone physics. You’ll discover how thrust, lift, and drag work together. This knowledge will help you build a better quadcopter. So, whether you want to capture amazing aerial shots or just enjoy flying your drone, let’s dive into the world of custom drone building.
Key Takeaways
- Quadcopters are the most popular type of drone, making up 90% of the market
- Frame sizes range from nano to large, with carbon fiber being the strongest and lightest material
- Brushless motors are preferred over brushed motors for their efficiency and speed
- Electronic speed controllers (ESCs) are essential for controlling brushless motors
- LiPo batteries power drones, with specs like cell count, capacity, and discharge rate
Gather the Essential Tools for Your DIY Drone Project
Before starting your drone build, it’s key to get the right tools. These tools will help you with everything from soldering to putting the frame together. They make the process easier and more fun.

Soldering Iron and Solder: A Must-Have for Electronics Assembly
A good soldering iron and solder are crucial for your drone project. You’ll use them to connect parts like motors and flight controllers. Choose a high-quality iron with adjustable temperature for clean soldering.
Multimeter: Diagnosing Electrical Issues Made Easy
A multimeter helps you find and fix electrical problems. It measures voltage, continuity, and resistance. This tool is great for checking battery connections and power distribution.
Hex Keys and Drivers: Assembling Your Drone Frame with Ease
Hex keys and drivers are vital for putting your drone frame together. Most frames use hex screws, so having the right keys is important. Also, get high-quality drivers for better grip and control.
There are more drone assembly tools that can improve your building experience:
| Tool | Purpose |
|---|---|
| Helping Hands | Holds components in place during soldering |
| Wire Cutters | Cuts and strips wires for neat connections |
| Specialty Pliers | Assists in gripping and manipulating small parts |
| Cable Ties | Organizes and secures wires for a tidy build |
| Heat Shrink | Insulates and protects soldered connections |
| Standoffs | Provides spacing and support for circuit boards |
| Electrical Tape | Insulates and labels wires for easy identification |
| Double-Sided Tape | Secures components temporarily during assembly |
| Thread Locker | Prevents screws from loosening due to vibrations |
With the right tools by your side, you’ll be well-equipped to tackle any challenges that arise during your DIY drone project.
Getting these essential tools ready will help you build your drone successfully and enjoyably. Quality tools make the process smoother and ensure your drone lasts longer and performs better.
Select the Perfect Frame for Your Custom Drone Build
Choosing the right frame is key when building your drone. The frame is the drone’s backbone, supporting all parts that make it work.
Understanding Frame Sizes: From Micro to Large Drones
Drone frame sizes vary by propeller size. The 5-inch frame is great for racing and freestyle, balancing speed and stability. Your needs and preferences will guide your frame size choice:
- Micro drones (2-3 inches): Perfect for indoor flying and small spaces
- Mini drones (3-4 inches): Great for beginners and easy to carry
- Standard drones (5-6 inches): Popular for a mix of speed, control, and flight time
- Large drones (7+ inches): Good for heavy payloads, like high-quality cameras
Choosing the Right Frame Material for Durability and Performance
The frame material affects your drone’s durability and performance. Carbon fiber frames are top choices for their strength and lightness. They handle crashes well and are durable.

- Aluminum: Strong and affordable, but heavier
- Glass fiber: Cheap but less durable than carbon fiber
- 3D-printed plastic: Custom and affordable, but not as sturdy
Frame Arm Orientation: X, +, or H Configuration?
The frame arm orientation is how the arms are set up. There are three main types:
| Configuration | Description | Advantages |
|---|---|---|
| X | Arms form an “X” shape, evenly spaced | Good balance, stability, and aerodynamics |
| + | Arms form a “+” shape, with two parallel arms | Simpler design, easy to add components, and good for payloads |
| H | Arms form an “H” shape, with two parallel arms and a central body | More stability, better for big drones, and holds more components |
Make sure your drone frame fits all your components and is sturdy enough.
Choose High-Performance Motors for Your Quadcopter
Building your own drone? Picking the right brushless motors is key for top performance. Look at the size, motor kV rating, and prop size to choose wisely.
Brushless motors have a four-digit code. The first two digits show the stator diameter, and the last two show the height. For example, a 2205 motor is 22 mm wide and 5 mm tall. Bigger heights, like 6 mm, are more efficient than smaller ones like 4 mm.
The kV rating shows how fast the motor spins per volt. Higher kV means more speed, while lower kV means more torque. Aim for a 10:1 thrust-to-weight ratio for best performance. Racing drones need a 5:1 ratio for agility, while photography drones prefer a 3:1 or 4:1 ratio for stable flight.
| Drone Type | Recommended Thrust-to-Weight Ratio |
|---|---|
| General Purpose | 10:1 |
| Racing Drones | 5:1 |
| Aerial Photography Drones | 3:1 to 4:1 |
Match motors with propellers carefully. Big props fit low kV motors, and small props fit high kV motors. For mini quads, use 1407/3xxx kV motors with 4-inch props, and 22xx/2700 kV motors with 5-inch props.
“Choosing the right motor and prop combination is essential for achieving the desired performance characteristics in your custom drone build.” – John Smith, Drone Enthusiast
It’s important to research motor performance and thrust data. YouTube, RCGroups, and Miniquad Test Bench offer valuable insights. By picking high-quality brushless motors with the right size and kV rating, your drone will fly smoothly and efficiently.
Understand the Role of Electronic Speed Controllers (ESCs)
Building your own drone means knowing about electronic speed controllers (ESCs). They work with your motors and battery. ESCs control the speed and direction of your drone’s motors, making flight stable and control precise.
ESCs are key in electric propulsion systems. They connect the battery to the electric motor. In hobby drones and RC vehicles, ESCs are used. But, in bigger applications, they’re called electronic control units, inverters, or motor controllers.
Brushed vs. Brushless Motors: Which ESC Do You Need?
Choosing an ESC depends on your motor type. Brushless motors need ESCs for control, while brushed motors don’t. Brushless ESCs are better for drones because they last longer and are more efficient.
There are different ESC protocols for sending throttle information. PWM, Oneshot125, Multishot, and Dshot are common. Dshot1200 is the fastest, sending data at 1,200,000 bits per second.
Matching ESC Specifications to Your Motor and Battery Setup
It’s important to match your ESC with your motor and battery. ESCs have parts like a microcontroller and MOSFETs. They also have a BEC and DMA.
When picking an ESC, think about a few things:
- Current rating: Make sure the ESC can handle your motor and battery’s current.
- Voltage range: Choose an ESC that matches your battery’s voltage.
- Programming features: Look for ESCs with options like customizable throttle curves and firmware updates for better drone performance.
By picking the right ESC for your motor and matching it with your setup, you’ll have a drone that’s high-performance, efficient, and safe.
Power Your Drone with the Right Lithium Polymer (LiPo) Battery
Choosing the right LiPo battery for your drone is key for top performance and safety. LiPo batteries are the top choice for drones because they pack a lot of energy. They have a high energy density, ranging from 140 to 200+ Wh/kg in weight and 250 to 350+ Wh/L in volume. When picking a LiPo battery, consider a few important factors:
LiPo Cell Count: Understanding Voltage and Series Connections
LiPo batteries usually have a voltage of 3.7 V per cell, with a max of 4.2 V. The number of cells affects the battery’s voltage, which is crucial for motor speed. Batteries are labeled with codes like 4S, showing four cells in series. Here’s a quick guide to common LiPo cell counts and their voltages:
| Cell Count | Nominal Voltage | Maximum Voltage |
|---|---|---|
| 1S | 3.7 V | 4.2 V |
| 2S | 7.4 V | 8.4 V |
| 3S | 11.1 V | 12.6 V |
| 4S | 14.8 V | 16.8 V |
Battery Capacity: Achieving Optimal Flight Times
Battery capacity, in milliamp-hours (mAh) or amp-hours (Ah), directly impacts your drone’s flight time. Higher capacity batteries mean longer flights but also add weight. Finding the right balance between flight time and weight is key for the best performance.
C-Rating: Ensuring Your Battery Can Handle High-Current Demands
The discharge rate or C-rating of a LiPo battery shows how fast it can safely discharge energy. For example, a 1500mAh battery with a 30C rating can safely deliver up to 45A of current. Make sure your battery’s C-rating meets or beats the current needs of your motors and ESCs to avoid overheating and damage.
When building your drone, picking the right LiPo battery is about balancing flight time, weight, voltage for motor speed, and discharge rate for your needs. Understanding the specs of lipo batteries and how they affect your drone’s performance helps you make a smart choice. This way, you can power your custom drone build with confidence.
Select the Best Propellers for Your Drone’s Size and Purpose
Choosing the right drone propellers is key for top performance. The propeller size and pitch greatly affect your drone’s abilities. Larger props push more air but need stronger motors.
Racing drones might use 6-inch props, while tiny whoop drones might use 2-inch props. This shows how propeller size matters.
The pitch of a propeller is shown by two numbers. The first number is the pitch in inches, and the second is the diameter. Props with higher pitch push more air but need more power.
Lower pitch props are faster and better for quick turns. The motor’s KV rating also matters. Lower KV motors work well with lower pitch props for better efficiency.
When picking drone propellers, think about your drone’s size, weight, and use. Also, consider motor compatibility, flight time, speed, durability, noise, and cost. Propellers made from durable materials like carbon fiber last longer.
The average life of a drone propeller is about 500 flight hours or a few months to a year, depending on use.
| Propeller Type | Characteristics | Suitable Applications |
|---|---|---|
| Two-blade | Efficient, less drag, longer flight times | Aerial photography, long-range missions |
| Three-blade | Balanced performance, moderate efficiency | General-purpose, moderate payloads |
| Four-blade | High thrust, increased stability, more drag | Heavy payloads, racing, aggressive maneuvers |
Choosing the right propeller is vital for your drone’s performance and safety. Consider your drone’s specs, motor, and use to pick the best propeller size and pitch. Always check and replace damaged propellers to keep your drone flying well and safely.
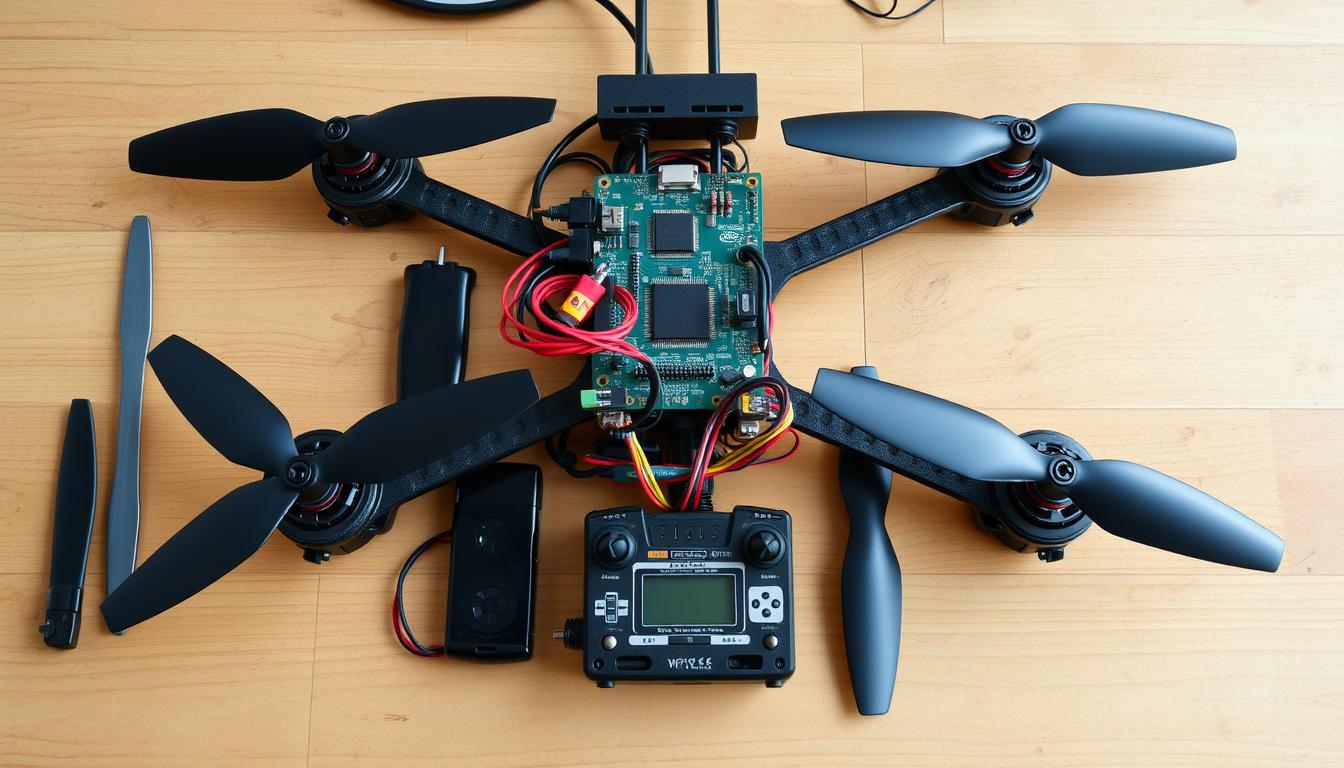
Building Your Own Drone from Scratch: A Step-by-Step Assembly Guide
Building your own drone is exciting and rewarding. It lets you understand the components and how they work. With the right tools and knowledge, you can create a drone that meets your needs and preferences. This guide will help you assemble your drone, from the frame to the flight controller.
Before starting, know that there are different drone kits. Each kit is for a different skill level and interest:
- Ready-to-Fly (RTF) drone kits are great for beginners. They come with everything you need to fly right away.
- Bind-and-Fly (BNF) drone kits are similar but don’t include a transmitter. They’re good for those who already have a transmitter or want to choose one.
- Almost-Ready-to-Fly (ARF) drone kits include the frame and motors. You’ll need to buy the transmitter, receiver, and battery separately. They’re perfect for those who like to customize.
- Do-It-Yourself (DIY) drone kits let you build a drone from scratch. They’re ideal for those who want to learn about drone construction and programming.
Assembling the Frame: Bringing Your Drone to Life
The first step is to assemble the frame. Quadcopter drones have four rotors in a symmetrical X or + shape. Frames are made of materials like carbon fiber, aluminum, and plastic. Each material has its own benefits.
Using the provided hardware, put the frame together. Make sure all connections are secure and aligned properly.
Mounting the Motors: Securing the Heart of Your Drone
After assembling the frame, it’s time to mount the motors. Quadcopter drones need four motors and propellers for stable flight. When choosing motors and propellers, consider their thrust-to-weight ratio, efficiency, and size.
Attach the motors to the frame arms. Make sure they are oriented correctly and firmly in place.
Connecting the ESCs: Powering Your Motors for Flight
Electronic Speed Controllers (ESCs) power your motors and control their speed. Connect each ESC to its motor and the flight controller. Follow the wiring diagram and ensure all connections are soldered and insulated.
Use zip ties or heat shrink tubing to keep the wires organized and protected.
Installing the Flight Controller: The Brain of Your Custom Drone
The flight controller is the drone’s brain, stabilizing and controlling its movement. Popular flight controllers include DJI Naza M V2 and Pixhawk 2.4.8. Each offers different features for various skill levels.
Mount the flight controller to the frame, ensuring it’s level and properly oriented. Connect the ESCs and other components, like the radio receiver, according to the wiring diagram.
| Component | Purpose |
|---|---|
| Frame | Provides the structure and support for all other components |
| Motors | Generate thrust to lift and maneuver the drone |
| ESCs | Control the speed and direction of the motors |
| Flight Controller | Acts as the brain of the drone, stabilizing and controlling its movement |
With the frame, motors, ESCs, and flight controller in place, your drone is starting to come together. Next, we’ll cover how to configure and calibrate your drone for the best performance. This will ensure a smooth and enjoyable flying experience.
Configure and Calibrate Your Drone for Optimal Performance
Before you fly your drone for the first time, you need to set it up right. This means adjusting the electronic speed controllers (ESCs) and the flight controller. Doing this ensures your drone flies smoothly and responds well. Taking the time to configure your drone properly will make your flying experience better.
Building a basic quadcopter can cost about 10,000 INR. Spending around 25,000 INR gets you a better drone with quality parts. When picking motors, look at the KV rating. Brushless motors are best for drones because they’re efficient and last longer.
ESC Calibration: Ensuring Smooth and Responsive Motor Control
Electronic speed controllers (ESCs) are key in making your drone’s motors move right. Proper ESC calibration is vital for even motor speed. Here’s how to calibrate your ESCs:
- Connect your ESCs to the flight controller and power source
- Remove the propellers for safety purposes
- Enter ESC calibration mode using your transmitter
- Follow the manufacturer’s instructions for your specific ESCs
For a smooth build, consider using a 4-in-1 ESC, which combines four ESCs on a single board, simplifying wiring and reducing weight.
Flight Controller Setup: Configuring Your Drone’s Settings
The flight controller is your drone’s brain. It handles inputs from sensors and the RC controller for stability and flight modes. Setting up your flight controller means:
- Flashing the right firmware (e.g., Betaflight, Kiss)
- Configuring the flight controller orientation
- Setting up the RC controller and channel mapping
- Calibrating the accelerometer and gyroscope
- Configuring PID values for optimal flight performance
| Component | Cost (INR) |
|---|---|
| Flight Controller (DJI Naza M Lite) | 8,000 |
| ESCs (Turnigy Multistar 20A, set of 4) | 2,500 |
| Motors (Turnigy Multistar Outrunner, set of 4) | 4,000 |
| Total | 14,500 |
By following these steps and choosing quality parts, you’ll build a top-notch drone. It will meet your specific needs and preferences.
Understand the Physics Behind Drone Flight
To build and fly your own drone, you need to know the basic physics. This knowledge helps you design and control your drone for better performance and stability.
Newton’s Laws of Motion: The Foundation of Drone Flight
Newton’s laws are key to understanding drone flight. They explain how forces affect your drone’s movement in the air:
- Newton’s First Law (Inertia): A drone stays in its motion unless a force changes it.
- Newton’s Second Law (Acceleration): The speed of a drone changes based on the force applied and its mass.
- Newton’s Third Law (Action-Reaction): Every force on a drone has an equal opposite force.
These laws help us see how a drone gets lift, stays stable, and moves through the air.
Thrust, Lift, and Drag: Balancing Forces for Stable Flight
For stable flight, a drone must balance three forces: thrust, lift, and drag. Knowing how these forces work is important for designing and flying your drone.
| Force | Description | Impact on Drone Flight |
|---|---|---|
| Thrust | The force from the drone’s propellers that pushes it through the air | Helps counter gravity and lets the drone climb, descend, or stay at the same height |
| Lift | The upward force from the propellers pushing air down | Works against the drone’s weight to keep it at the same height or go up |
| Drag | The air resistance that slows the drone down | Slows the drone’s speed and needs more thrust to overcome |
By changing the propeller speed and angle, you can balance these forces. Mastering thrust, lift, and drag is crucial for a stable, efficient quadcopter.
The drone’s ability to hover, climb, descend, and move depends on adjusting the thrust (speed) of the rotors.
As you build your drone, remember these physics principles. They help improve your quadcopter’s performance and ensure stable flights.
Essential Safety Tips for Flying Your Homemade Drone
When flying your homemade drone, safety is key. Learn about local drone rules and follow them. Avoid flying near airports, crowds, or sensitive spots to prevent risks.
Make sure your drone is built right and calibrated well. Check it before flying for any damage or loose parts. Do a pre-flight check to make sure everything is ready, like battery levels and sensor calibration.
Start by flying in open areas to get used to controlling your drone. This lets you practice without worrying about obstacles. As you get better, you can fly in more complex places. Always keep your drone in sight and know how to land quickly if needed.
By following these tips, you’ll enjoy flying your drone safely. Whether you’re taking amazing photos or just flying for fun, remember to always prioritize safety. Happy flying!